Getting Married, Visas and Home Affairs

I recently got married and moved to the ‘States.

Over the last several months I’ve had to do a lot of admin, below you can find some info relating to some of the topics.

  • Civil Marriage in SA
  • Home Affairs Department (ID and passports)
  • Police Clearance
  • US Visa application
  • US Work permit

Civil Marriage
Civil marriages can be performed by registered officiants at a number of Home Affairs Departments. The process itself takes only 30min, and is by appointment only. At the end you are given a hand written marriage certificate, with the option to thereafter apply for an abridged or unabridged marriage certificate. At the wedding ceremony the two people getting married as well as two witnesses must present themselves all with valid ID documents. You also require an ID photo for the two people getting married.

Booking is another matter. Not all Home Affairs offices do marriages. I phoned about 10 different offices around the Cape trying to find out the best process. Off the top of my head: Wynberg and Bellville both do marriages, but you are required to go to the office to make an appointment and both were booked up well over a month in advance.

Caledon, Stellenbosch and Somerset West, none of them perform marriage ceremonies. Somerset West does have a marriage ceremony room, but not yet a qualified person, so this may change in the future.

We ended up getting married in Paarl. The Paarl home affairs office has a much shorter waiting list (potentially less than a week). They do however only do ceremonies Tuesday through Thursday, and only until 11h00. The big bonus is they will take appointments over the phone. I had to provide only our ID numbers, and they made a booking for us. On the day we pitched up 15min before the scheduled time, no queues and went straight to ceremony.

You are welcome to have a few friends/family members attend, the room wasn’t big but you could probably get 8 or so people in. The officiant will run through a short ceremony, you can do ring exchange and other traditions if you want.

More info here.

Home Affairs – other
There’s a lot to be said about Home Affairs Departments. With a number of things they have really improved over the last few years, especially with the turn-around time of passports and IDs. This is usually around a week (always less than 2) from the day you apply.

While waiting times at departments can still be extensive, it is at least structured, with you arriving, discussing your topic with a receptionist and receiving a queue number and instructions on where to go, what to do next.

It’s not perfect, but improving and with passport and ID collection being rolled out to certain banks, at least they’re working on the problems.

That being said, major centres have longer queues than smaller centres. Chat to friends and family, often it might worth a half hour drive to a nearby centre to sit in a half hour queue, instead of sitting two hours or more in a busier centre.

There is also a bit of luck involved, with day to day and hour to hour fluctuations which are hard to predict.

Police Clearance
Getting a police clearance is a pain. Applications can only be done through the SAPS. You must go to your nearest police station and request a police clearance. They will ask you to pay an application fee (for me it was R94 I think) and then they will fill out an application form and take all your finger prints manually with ink. You need to bring your ID with as well.

They will then you give the application form with your fingerprints. The SAPS can submit the form themselves, but this is not advised and it can more than double the time it will take to get your clearance back. The SAPS I went to told me I should get it couriered and suggested a nearby PostNet branch that I could do it through. This adds a significant cost, depending on what courier service you use, this is an extra several hundred Rand.

My wife submitted her application through her local SAPS about a month before I submitted mine via courier, and they both got accepted by the Criminal Record Centre in Pretoria at the same time. I also received mine back a good month before she received hers. You can also submit your document yourself at the CRC office in Pretoria. Once received, if a number is provided, you will receive an SMS with a reference number.

When the CRC receive your application, you can start tracking it online here. Note, this is only when the CRC receive it, not when it gets submitted at your local SAPS. Once received it took the CRC 3 weeks to process my police clearance. From registration date to finalised date (terms on their website). Between then you don’t receive any info. You just wait.

For more info, phone numbers, addresses etc, check the SAPS website here.

US Visas
The US Visa system is complicated and encompassing. They have a many different kinds of Visas depending on who you are, where you’re from, and what you are wanting to do in the states. The biggest differentiation they make is between visas with or without intent. Intent refers to intent to become a citizen.

Visas without intent are generally easier to get, but then you can’t use it to jump-start your application for a green card. My wife was going to be at a university, which gave us the choice between two relevant non-intent visas, the J and F visas. Both visas require a sponsor (such as the university she was going to). We opted for the exchange (J) visa instead of the student (F) visa. The biggest reason for this, is that I would need a spousal visa to come with her to the states.

In the US, a J1/F1/H1 etc visa is given to the main applicant, and spouses and dependents can apply for the equivalent number 2 visa, J2/F2/H2 etc. The J2 has the benefit over the F2, in that as a J2 visa holder you are allowed to apply for work authorisation and thus undertake any work you find while in the US. As an F2 visa holder you are only allowed to study, and not undertake employment.

The biggest drawback of the exchange (J) visas is that at the end of your time in the US, you have to return to your home country for 2 years before applying for an intent visa. This is because you are deemed to have benefited from your time in the US, and you need to return to your country to impart that knowledge/skills. That is the point of the exchange visa.

Applying for US visas is a step by step process. If you follow all the steps, and tick all your boxes you should get your visa. It can be a time consuming process, but ultimately worth it. Depending on your visa type there will be a number of forms you require before making an appointment, including completing online background check forms. Waiting times for appointments is generally less than a week.

This culminates in an appointment at your local embassy. We interviewed at the Cape Town US Consulate General in Steenberg. We had an appointment at 08h15, and they seem to schedule several people every 15min. There is no parking at the embassy, with the nearest parking a few hundred metres down the road at Steenberg Village.

Try take as little with you as possible, only required documentation. You will be asked to leave bags, cellphones and other electronics at the desk. They have some lockers provided.

Our appointment was very quick, we spoke to two different people, showed them all our documentation, and left the consulate within 15min of arrival, however you don’t know outcome of your application until you receive your passport back. Ours took only two days, and we received our passports via courier.

All in all a long tedious process. But if you follow the steps, it should work out. The US government websites are fairly insightful and have all the information you require.

US Work Permit
As the holder of a J2 exchange visa (along with a number of others), you are able to apply for a work permit, also known as Employment Authorization. On the J2, you are only allowed to apply for employment authorization once you arrive in the US.

Note: This process is completely different to someone trying to get a temporary work Visa such as an L1 or H1-B.

Once again the process is relatively straightforward requiring one to fill in the necessary forms, pay the required amounts and wait. The necessary form is an I-765. I submitted my form via post and received SMS notification about a week later. A reference number is provided, but it may take up to 45 days for this reference number to register on their website.

For a J2 to receive a work permit, one must show that the J1 and J2 do not require the income from the J2 to sustain themselves in the US. I supplied letter of funding from my wife’s university along with bank statements in my wife’s name showing that she has sufficient funds to support us during our time here.

Along with this they require copies of your DS2019 (Certificate of Eligibility) and most recent I-94 (US Admission Record) as well as a cheque for $380.

The process should not take more than 3 months. I am still waiting, but I am only in month 2 at the moment. Hoping to hear back soon :) During the process you may be required to show up in person for an interview and so bio-metric data can be taken.

Most people I’ve spoken to who have applied have received their work permits, although often taking 4 months for the whole process to be completed. There is no guarantee though.

2016 Mercedes-Benz C200 4matic (W205)

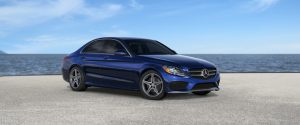
Earlier this year I got the opportunity to take out a new C200 4Matic for a couple days. It was my first opportunity with the W205, and quite an enjoyable one too. Mine came out in the new Brilliant Blue colour, which suits the car really well. The car further had the AMG suspension and trim kits. It had the 7 Speed DCT gearbox fitted.

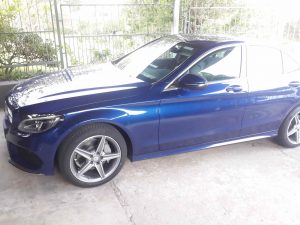
terrible quality photo of the car I had

terrible quality photo of the car I had

With a starting price of R495,000, these are not cheap cars. The model I had had a plethora of extras, pushing the retail price all the way up to R631,500. So I packed in some friends and did a mini-road trip covering 1500km and various terrain over a few days. It is a really nice car. A noticeable upgrade to the W204, interior is impeccable, and the shape has started to grow on me.

The car seated 4 of us comfortably. Leg room in the rear is sufficient, if not great, and the coupe sloping rear window does not impede head room. The boot was large enough, but feels smaller than that of the CLA. There is a surprisingly large storage area underneath the boot, where a spare-wheel would have gone in a previous car, although not large enough to support even a modern-day space-saver (I did at least get run-flats). The back row does have space and a seat-belt for a 3rd person, but this would be quite tight, and the space is put to better use by the armrest (with storage compartment and cupholders).

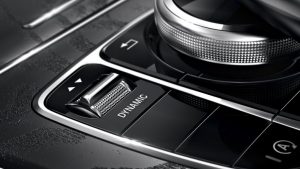
The C200 is a 1.9 litre turbocharged engine, putting out 135kw. The engine has 4 driving modes, Economy, Comfort, Sports and Sports+. It’s nice and easy to flip through these settings (better than the 204), and each one adjusts the engine/transmission, steering and aircon performance. I’m not 100% sure, but it seemed to affect the stiffness of the suspension as well. Maybe this was just in my mind, but we did some very scientific tests driving over speedbumps and it seemed to have an affect.

I spent 80% of the time in Sports mode, 15% in Sports+, and only the remainder in Comfort. And I noticed this when I filled up with petrol. The car has claimed consumption figures of between 4.4 and 7.3 l/100km. I averaged 9.5 at normal highway cruising speeds. The car had the extended range fuel tank, which can take somewhere over 70litres, including the reserve. Which gives you a really great range, especially for South Africa.

Driving mode selector (source: Mercedes-Benz)

Driving mode selector (source: Mercedes-Benz)

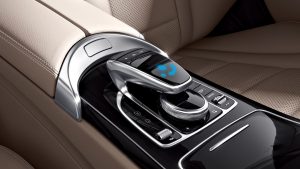
The entertainment system and centre console is mostly well put together. All the functionality worked and was relatively easy to navigate. The car had the standard Merc joystick, but included the optional touchpad. The touchpad is terrible. I really didn’t like using it, and ended up disabling it. Maybe it would have gotten better with more use, but I found it much easier to navigate with the joystick. Additional USB and SD card inputs are located within the centre armrest, which is convenient.

Centre console touchpad (source: Mercedes-Benz)

Centre console touchpad (source: Mercedes-Benz)

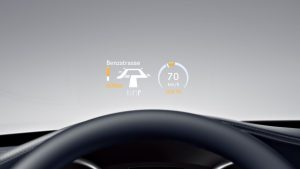
Although this car didn’t have it, a heads-up-display (HUD) is an optional extra on the C-Class. I’ve driven short distances in a car which has this option, and it’s really great. It displays your speed, navigation information and other info on the windscreen in front of you. It worked well even in bright daylight. Definitely recommended if it’s in your price range.

Heads Up Display source: Mercedes-Benz

Heads Up Display (source: Mercedes-Benz)

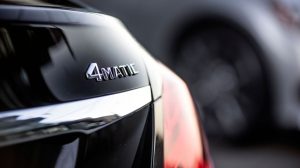
As mentioned, this car came fitted with Merc’s all wheel drive system, 4matic. It was my first time driving an all-wheel drive sedan, and what a pleasure. No matter the corner you take, the car just sticks. It was a pleasure to drive, and something I’d love to test out round a track. While we did do a few short sections on gravel, the cars AMG suspension made this unenjoyable, extremely harsh, and completely put me off trying to test out its all wheel drive capabilities.

While the car was comfortable to drive, and came with electronically adjustable seats and steering wheel, I couldn’t shake the feeling that the steering wheel wasn’t centred around the driver’s seat, and that it was slightly more towards the centre of the car. It didn’t bother me too much, but after long stretches, I needed a bit of a stretch.

The car was fitted with two unusual extras for South Africa. Firstly seat warmers, and secondly a remote control to activate heating in the car. Even though it was well over 20 degrees C outside we tested out the seat warmers which blow nice hot air at the driver and front passenger’s bodies. The remote control makes use of an additional petrol powered heating unit in the engine bay to warm up the cabin. It can be activated from inside your house a few minutes before you have to go somewhere, so when you get to your car, it’s already warm.

I really enjoyed my time with the car. As mentioned, a definite upgrade on the 204, and noticeably placed in a higher class than the CLA to which I was accustomed. The C200 is an acceptable version, although with the extra wait of the 4matic, a larger engine would be preferable. That being said, it cruises easily, and is happy to drop gears when the need for overtaking is required. A well put together car, the trim is exceptional (especially the black ash in this model), and it was a pleasure to drive.

Deciphering your VIN

Have you ever wondered where your car was built? Maybe not, but having worked for a car manufacturer in South Africa for 3 years, I was always curious upon coming across such a car whether it was built in my plant or not. Fortunately every car since 1981 (at least) comes with its own special identity number, known as a VIN (Vehicle Identification Number).

What’s better is that the VIN is fairly straightforward to decode (usually) as per ISO 3779. Although it can become quite complicated, the basics are there for anyone to read.

The VIN is a 17 digit alpha-numeric string consisting of 3 pain parts. They are:

  • digits 1-3: World manufacturer identity
  • digits 4-9: Vehicle descriptor section (VDS)
  • digits 10-17: Vehicle identifier section (VIS)

World Manufacturer Identity
Each country that manufactures cars is assigned an array to give out to manufacturers in their country. South Africa for example has the array AA(A)-AH(9). The Society for Automotive Engineers in the US decides how these are assigned, so there is no fixed pattern to deciphering extra meaning. In SA, VW is AAV, while Hyundai has both the AC5 and ADD nominations. You can view more of them on the wiki page.

So I can look at any car in the world, and if its VIN starts with the letters AA-AH, I can know it was built in SA.

Vehicle Descriptor Section
This will be a 5 digit value, followed by a check digit. The 5 digit value may include information relating to the type of vehicle (sedan, truck etc), the engine type or other vehicle specific information, but it is not consistent and varies across manufacturer and producing region.

Vehicle Identifier Section
This is an 8 digit value. Usually it starts with a digit indicating the model year of the car (10th digit overall), followed by a 7 digit number. This might be sequential as defined by a manufacturer, but it must somehow be unique to a particular vehicle.

As you can see there’s not really that much to VIN numbers, but at the same time there’s a lot. Certain websites can decode your VIN to give you information about it, but results will vary a lot depending on what car you have.

The US Department of Transport (linked with the SAE) actually provide a lot of information. Check out their main page here. They have a decode your VIN tool, you can search for MFI’s and a number of data. An MFI search for Mercedes-Benz in South Africa returns the codes ADB, AFV and AHM. BMW returns the MFI ABM.

I found a random VIN on the internet, and it decoded and gave me info on the make, model and year. Told me it was an SUV, what transmission it had, the engine model, what horse power it what as well as some more info. Testing with my old South African car however provided an error stating the manufacturer was not registered for sale in the US.

If you’re every looking for your car’s VIN, you should be able to find it at the bottom of your windscreen when viewed from the outside. It will also be inscribed somewhere in your car, usually under/near the driver’s seat. Certain OBD applications will also be able to electronically read your car’s VIN.

Source: wiki

Marvin Braude Bike Trail

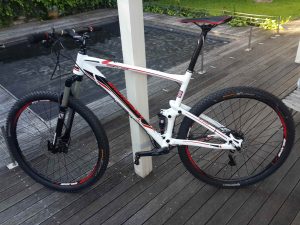
Finally having a day free (not waiting for UPS/Fedex to show up), I took my bike down to the beach. LA is blessed with a beautiful coastline, and a 35km bike route starting at Will Roger’s beach, and ending at Torrance County Beach.

Often referred to as the Strand, it was officially renamed in 2006 for LA Councilman Marvin Braude.

The route is really great, comprising of a wide concrete path, right on the edge of the beach. In some sections you share the path with pedestrians, but for the most part it’s just for cyclists. There is one slight detour around Marina del Rey, a combination of on-road bike lanes and separate paths.

metro bike

metro bike

Not living by the beach, I opted to take the Metro to Santa Monica. I then rode north to the start of the trail, and all the way down to its end. For midday on a Thursday there were more people than I expected, but not crowded at all.

Start at the Will Rogers Beach

Start at the Will Rogers Beach

I did it in about 1hr25min on my mountain bike, but it would probably take longer if you just want to go for a relaxed ride (Google reckons 1hr45m).

Santa Monica Pier

Santa Monica Pier

detour

My detour in red

I also did a slight detour by Marina del Rey. You can see on the below map where I should have turned, but it’s not signposted, and if you don’t know there’s a turnoff you might miss it. I point it out in the video at the bottom as well. I only noticed when I ran out of bike lane though several hundred metres on.The trail can be unofficially continued through the Palos Verdes Peninsula, and then continued along to Long Beach. I opted to grab the Metro back home instead.

Trail End Beach View - Torrance Country

Trail End Beach View – Torrance Country

I did a GoPro compilation of many sections of the route which you can check out below.