Moving to Ottawa I was lucky enough to fall into a great group of squash players at my local club. A bunch of the players had a standing appointment every week, and we’d rock up and play some squash. It was a bit haphazard as to who you would play, but you always got a match. One of the members eventually started pre-scheduling the matches for everyone, using one of various online round-robin calculators, this way it ensured you got a match, and, for the most part, meant you got to play someone different each week.
The online, free, round-robin generating software isn’t that great though. It lets you plug in a bunch of names, and it generates one full round robin, which was then applied to each week. But not everyone is available every week, so you end up manually making changes, and before you know it, chaos reigns, and you’re playing the same person multiple times.
To be fair, this isn’t a major reason to do what I did, but it was certainly a contributor. One of the great things about squash in Ottawa, is they use on an online ranking system called Rankenstein. It’s used by pretty much everyone in the greater Ottawa region, and it’s used both for scheduling and tracking the City League, as well as tournament records, and challenge matches. With this data available to me, a desire for a better scheduling system, and a node.js learning side-quest, I was set.
Most of the system was fairly straight-forward to develop. There’s nothing particularly fancy about what I did. I would schedule a month’s worth of matches at time, soliciting everyone’s availability, and only scheduling a match for those people who expect to be there. I also have access to the Rankenstein data, so I can see when last everyone played each other, whether part of our weekly forays, or in a separate context.
With this information I had everything I needed to schedule matches for everyone, every week, with the data in-hand to reduce the likelihood of a repeat match. I just had one piece out-standing, how do you actually figure out a round-robin schedule.
If you’re just creating a simple round-robin for X players, it’s pretty straightforward. If you have 6 players, you just pair player 1 up with each player week after week, then player 2, etc. If you have an odd number of players, you just add a “Bye” player. Then you get a simple round robin like this:
| week 1 | week 2 | week 3 | week 4 | week 5 |
|---|---|---|---|---|
| 1v2 | 1v3 | 1v4 | 1v5 | 1v6 |
| 3v4 | 2v6 | 2v5 | 2v3 | 2v4 |
| 5v6 | 4v5 | 3v6 | 4v6 | 3v5 |
But this isn’t the only solution. Yes, you can switch the week’s around, but there’s also different combinations of ways you can have people playing. For example, if we just looked at the first week, if we say 1 is going to play 2, you can also have 3v5 (with 4v6) and 3v6 (with 4v5).
And it was with a pen and paper as I was trying to figure out these various combinations that I noticed an underlying pattern. If we have 2 players, there’s only 1 possible combination. If we have 3, we include a bye player, so we have 4 players. With 4 players, there is also only one set of options. 1v2 & 3v4, 1v3 & 2v4, 1v4 & 2v3. With 5 or 6 players, just pull out the two players and have them play each other, and the last 4 play the above solution. So we have 1v2, 1v3, 1v4, 1v5, 1v6, and for each of those, the other 4 play the above solution. If we then went to 2v3, and tried to generate the rest, we’d end up repeating one already created, so it’s not necessary.
So for a 4 player pool, we have 3 potential sessions. For a 6 player pool, we have 3 potential sessions for each 4 player pool, which is left over from the 5 player possible matches, for a total of 15 matches.
If we pushed that up to 8 players, we do the same thing, we pull out 1v2, 1v3, 1v4, 1v5, 1v6, 1v7 and 1v8, then recursively call the function for the remaining 6 players. Which gives us 7 possibilities, times the original 15, for a total of 105. so for an even number of players N greater than 4, the number of potential sessions is a geometric progression. 6 players = (6-1)*3. 8 players = (8-1)*(6-1)*3. 10 players = (10-1)*(8-1)*(6-1)*3.
This can get quite large; for 12 players it would be 10,395 sessions, each with 6 matches. Fortunately the computer is doing all the hard work, and we’re usually limited to a max of 14 players. I’m also only scheduling one week at a time, so I don’t have to figure out perfect rounds for n-1 weeks.
So we get to implement recursion!
function get_all_possible_sessions(players)
{
    if (players.length % 2 != 0 || players.length < 2)
    {
        logger.warn("get_all_sessions - number of players not even or less than 2");
        return [new Session("",[],[new Match(-1, -1)])];
    }
    else if (players.length == 2)
    {
        return [new Session([new Match(players[0], players[1])])];
    }
    else if (players.length == 4)
    {
        let allSessions= [];
        allSessions.push(new Session([new Match(players[0], players[1]), new Match(players[2], players[3])]));
        allSessions.push(new Session([new Match(players[0], players[2]), new Match(players[1], players[3])]));
        allSessions.push(new Session([new Match(players[0], players[3]), new Match(players[1], players[2])]));
        return allSessions;
    }
    else
    {
        let allSessions= [];
        for (let i = 1; i < players.length; i ++)
        {
            let match = new Match(players[0], players[i]);
            // let tempPlayers = structuredClone(players); only introduced in v17
            let tempPlayers = JSON.parse(JSON.stringify(players))
            tempPlayers.splice(tempPlayers.indexOf(players[0]),1);
            tempPlayers.splice(tempPlayers.indexOf(players[i]),1);

            let sessions = get_all_possible_sessions(tempPlayers);
            sessions.forEach(session => {
                session.matches.push(match);
            });
            allSessions.push(...sessions);
        }
        return allSessions;
    }
}
Before I looked at how to program this particular topic, I had spent some frustrating time with ChatGPT, trying to get it to give me something useful, but I really struggled to get it to understand what I wanted. No manner of, “that’s not what I asked for, I actually want…” seemed to be able to get me what I want. It’s possible that newer models will perform better, but in the end I’m happy I was able to figure out a straight-forward solution myself.
Once we have all the session and match combinations, we update each one specifying when last those two players played each (or are scheduled to play each other). We also pass in information related to scheduled byes, to try avoid the same player being scheduled a bye more than once in a set.
Put it all together and you can share a link to your group with something like this:
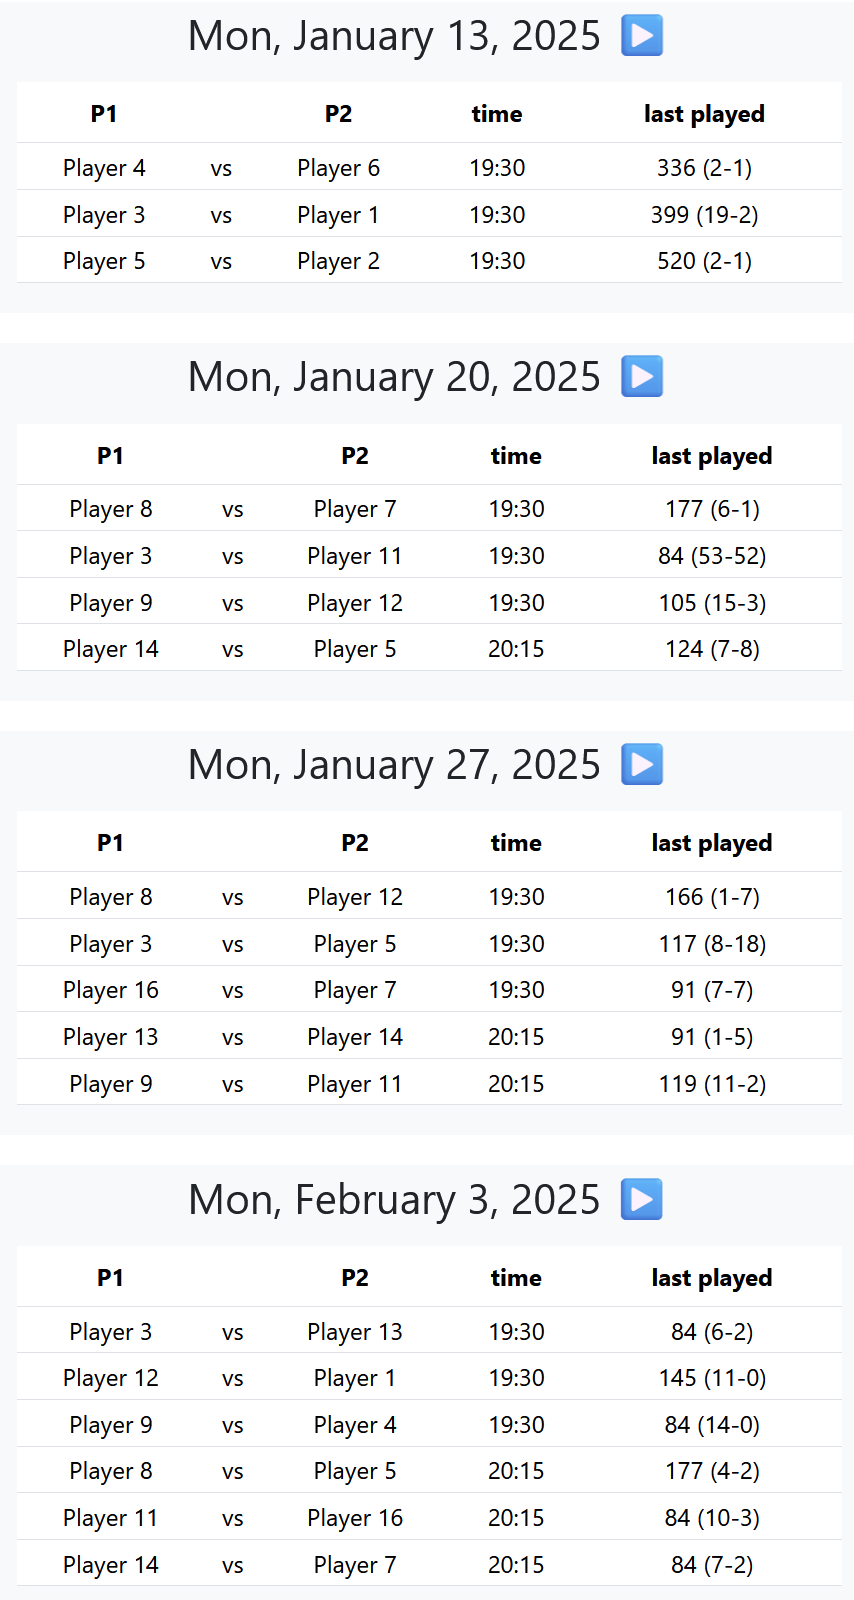
You’ve got the matches for each week, along with how many days since the players last played each other, and a historical win ratio.
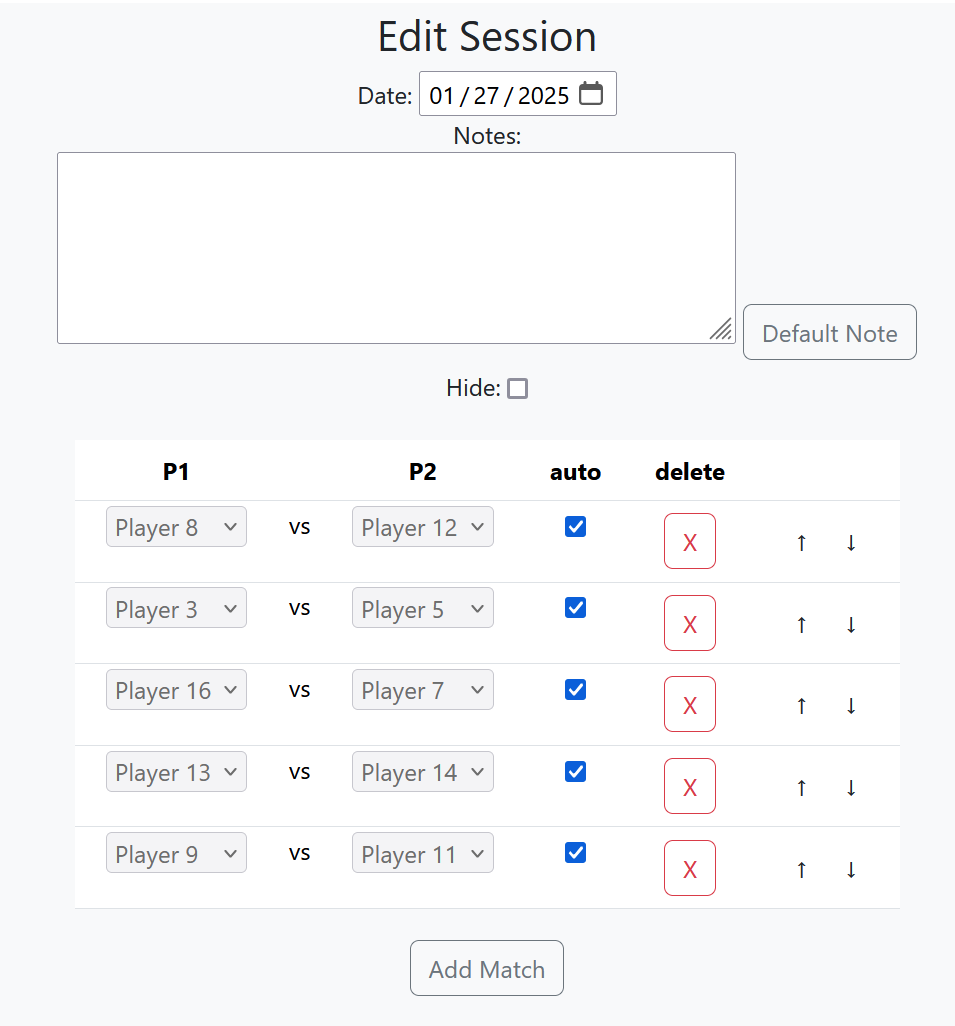
There’s a login field for whoever’s administrating, and they get the same interface with additional options to make changes, schedule new sessions etc. They can manually override matches if someone can’t make it anymore. You can also manually schedule some games, and then let the system generate the remaining matches, based on players not yet scheduled.
It’s been almost a year since I started using this for the scheduling, and it’s worked pretty well. I’ve made small improvements and adjustments over the year, and it works pretty well for what it is. There’s definitely more complex stuff I’d like to do withe project, but the amount of time to implement it just doesn’t warrant the small benefit I’d experience from it, so for now this project is pretty much complete.
The project is written in Node.js, using Express and ejs templates. My biggest issue is that at the time, my web-host only let me run Node.js 14, although it looks like they now support up to 22. The next project is in the works, time to tick React off my development checklist.