Design of a 2-axis, Continuous Rotation, Camera Control Platform

This was the title of my final year project for my BEng (Mechatroics) degree at the University of Stellenbosch. It’s been a year, a loooong year, but at the same time it’s passed so quickly. I’ve probably spent more time on varsity work this year than in any other previous year, a combination of this skripsie, mechatronics and electrical design projects, interspersed between the year’s class requirements.

You can see a summary poster of the project here. And the full report here.

Skripsie is something very different to what we’ve done previously. We’re given a year to complete the project, which is a fairly long time. What I’ve appreciated is the fact that it’s the only major project we’ve been given to do individually. It’s not that I don’t like other people, it’s just that it’s sometimes nice to be able to do things my way. Most of the projects are put forth by lecturers, and they act as supervisors for the projects. I’ve been very fortunate with my supervisor and his continued support and enthusiasm for my project.

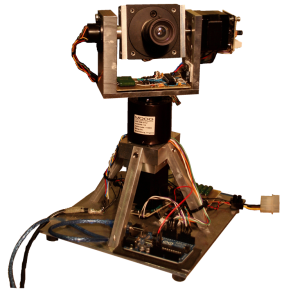
Final Product

Final Product

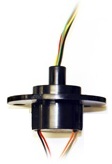
So what is it? Well it’s basically a turret that is capable of continuous rotation. You get a bunch of pan/tilt cameras on the market, but they all stop after 360textdegree or less. The department I did my project with had purchased several Basler a311fc cameras to play with and desired a platform they could use for tracking. It’s a very nice camera, good quality and capable of fairly high capture rates (50fps @ 640×480, 132fps @ 320×240) and comes with some nifty software (Basler Pylon Driver) to control it. So the major issue was to transfer data and power to the camera. I looked at a couple of wireless solutions but for simplicities sake eventually went with slip rings. Picked up 2 slip rings (at quite a cost, well I was surprised at the expense) from Moog.

a slipring

a slipring

Next issue was control. My control systems has never been the strongest, so decided to stick with some open loop control in the form of stepper motors. Picked up a 220Nmm and 440Nmm stepper motor to control the tilt and pan respectively. They’re bi-polar hybrid stepper motors with a 0.9textdegree step size. I drove them both in half-step mode effectively giving me 0.45textdegree accuracy. To drive them I made use of a combination of L297 and L298 ICs from ST.

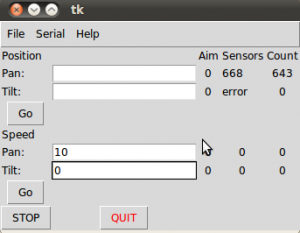
The idea was to be able to control this all from a PC, so some software development and integration was also required. To bring it all together I made use of an Arduino Uno. I developed a GUI in Python which then communicated via a serial connection with the Arduino. I was originally going to use Java for this, but couldn’t get a serial connection running. Chatted to some friends who suggested Python and found this post with a nice example. For testing I also got hold of two AS5040 hall effect sensors from Austria Microsystems. These rotary encoders give a 1024bit resolution, effectively 0.35/textdegree. I managed to find some nice code for the Arduino to read the data via SSI over at RepRap.

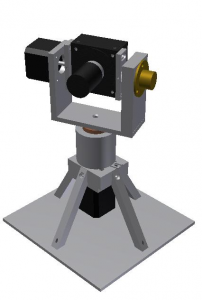
CAD Model

CAD Model

This was also the first time I’ve had the opportunity to develop CAD models of something and have it built. We’ve done several machine design projects over the years, but they’ve all been conceptual only. I didn’t machine the stuff myself, but it was pretty cool when I built the thing, and compared it to my model, and it looked the same.

screenshot of the UI

screenshot of the UI

So I handed in the final report on the project today. Unfortunately it’s not working 100% at the moment, and one of the motor driver circuits got damaged, so I need to repair that before my presentation in a few weeks time.

But until then, it’s 3 exams in 3 weeks, so ought to be pretty chilled. And I’m almost an engineer o/

Kindle’s and DHL

It seems like me being bored is not a good place to be, as while studying for my last exam last week, I got bored and convinced myself to buy a Kindle. It was fairly sudden, although I had been contemplating it for quite a while. I thankfully do not regret the decision at all :) I’ve also loved the e-ink display since the moment I first saw it.

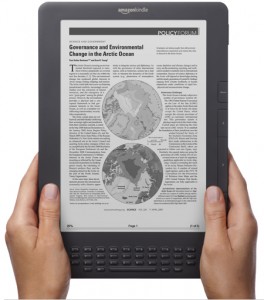
img: images-amazon.com

The choice of Kindle is fairly straightforward. There are 3 main choices. All 3 versions come with WiFi standard. The cheapest of the lot (6″ screen) goes for $139, then there’s the one up version which comes with 3G connectivity extra for $189. Then there’s the Kindle DX, which has a larger screen (9.7″) also with 3G which goes for a rather high $379.

A friend recently bought the DX and figured it wasn’t really worth it for the extra area, and at that price I wasn’t too keen to get it. Comparing the other two I decided I’d get by with only the Wi-Fi and decided to spare myself the $50.

There’s one other choice. The two smaller Kindles can be bought “with special offers”. This basically entails you getting a $25 discount at the cost of having some adverts shown on the screensaver and the home page. Reading some reviews, it seems the ads aren’t that intrusive, so I figured I’d get that. At $114 I felt it was the best choice.

So I happily went online put it in the basket along with a cheapish cover. Unfortunately, as I find out, non-Americans can’t buy the versions with Special Offers. If you plan to purchase one, you also need to select the international version, comes with a USB cord in place of the wall charger.

You, like me, may also pick a very nice case, on special, from Amazon, and then when you try and buy it get told you can’t buy it because you’re South African. Certain products on the store are only for the American market so you can’t be assured you’ll be allowed to purchase a product.

So in the end I left the nice leather case, and just picked up a cheap cover from E-Bay. I also decided to just go for the plain Kindle for $139.

You aren’t given any choice with postage, which is fine, you are forced to select priority postage. This means you get your Kindle in about a week and it only costs about R150. This is less than what certain local retailers charge for postage.

There are several places you can get hold of a Kindle. Locally I’ve seen adverts on Gum Tree, wantitall also advertise them as well as digital planet. However all these offerings end up costing you at least R300 more (on the base model).

The final price I paid was roughly R1250, including postage, including import duties.

img: enterpriseirregulars.com

The next fun part is DHL. I’ve ordered things locally and had them couriered by different people, mainly Speed Services, and have always been happy with the service, DHL however were almost flawless in their Delivery, and their tracking website is just great. It would appear that every single time the package gets scanned, it gets logged and is visible online.

I went to sleep that night, and by the time I had woken up the next morning, my Kindle had already travelled the width of America. That night it was in England where it sat around for a day before it ended up in SA, went through customs on Sunday and was all set to be delivered to me on Monday. This is where the almost flawless comes in. They somehow managed to send it to the wrong DHL centre in Cape Town, which delayed my delivery by a day. This wasn’t too much of a concern though, as you can subscribe to email updates, which meant I knew this at the beginning of the day, and the following morning I received an email to say it had been dispatched. Ordered Thursday night, arrived Tuesday morning.

DHL also have some fairly cool webpages relating to the logistics and things to do with their sorting and transport etc. If you’re bored, have a look here.

img: expertreviewnow.com

I had expected the process from here on out to be fairly pain free, however this was not to be. It’s not that it shouldn’t be, it’s just that Stellenbosch University’s internet and network structure isn’t managed that nicely. The Kindle appears to have a complex way of connecting, before it allows one to connect to a Wi-Fi network, it checks whether it can get through to the internet, this was fine and I managed to connect my Kindle to my personal Wi-Fi AP, and surf the internet from my Kindle, but it refused to register itself.

I tried all kinds of things, and took it to a friend’s house who did some WireSharking but couldn’t really figure out what was going on, the Kindle didn’t appear to be trying to connect, and that traffic it did generate didn’t appear to have any issues, but it just wouldn’t work.

Anyway, I took it home and used the Wi-Fi there and it worked immediately, registered itself and downloadedthe messages that were waiting to be downloaded. It now also works fine with my Wi-Fi at the university.

— EDIT — 15 June

Makro today announced that they will be selling the Kindle locally. At a quoted price of R2500 for the Kindle 3G, it sounds kinda ridiculous. You should be able to import the same Kindle including postage/taxes for about R1700.

Window’s network sharing

On the university network here, we’re only allowed to plug one computer into the network points in our rooms. If you try plug a hub in, or bridge connections to other computers the network detects this and blocks all the computers on your network point until the problem is rectified. I’m sure the varsity has several reasons for doing this, one of which being that they assign every computer a unique IP address, and there list of addresses is limited, as well as it being a way to keep track of what computer’s are on the network, as one is required to register your computer’s mac address, so they can assign the same IP address.

In any case, this makes life difficult for people with more than one computer, or with a computer and a console. One way to get around this is to setup a NAT. You plug your registered computer into the network, and then plug other devices into that computer. By setting it up correctly, those devices are hidden from the network, and all traffic is just routed via your main computer. I made use of this last year, but this year invested in a MikroTik Router Board 750 which effectively does the same thing.

In any case, from Windows, the easiest way to do NATing is to make use of Windows built in Network Sharing. It’s a fairly straightforward setup. All that’s required is two network cards. And you can plug a hub into the 2nd network card if you require more devices. I recently put together a step by step guide to setting it up which can be downloaded at the bottom of this page.

It gives instructions for setting up Windows Network Sharing in both Windows 7 and Windows XP. One example is with sharing an internet connection from a WiFi network to a LAN network, and the other is LAN to LAN setup.

If you are wanting to setup a wireless AP, that is use a WiFi card to share a network connection, I advise making use of a program such as Connectify, which I have used on several occasions to great success. It allows one to easily setup a wireless AP, and automatically allows password encryption.

You can download my step by step guide here (592 kB).

Of Cake and Disappointments


Portal 2, the sequel to one of the most humourous and fun puzzle games ever made, Portal, released this week. This week Tuesday, a few days before planned launch. This was good news for me; see Portal 2 is the first game I’ve ever cared enough about to bother preordering. Quite a while ago in fact, back in February. And as such I preordered it for my PS3, my PC lacking the necessary gusto required to play modern games.

In any case, the early release ensured that I would get the game before the long weekend, giving me plenty of time to sit around and finish it, leaving next week open to work off my backlog of work. And as it sits I played, thoroughly enjoyed, and finished the game. The single player mode in any case, see Portal 2 comes with a bunch of extra co-op missions for you to play with a friend. And I have such a friend, with a PS3 and sharing the enthusiasm for the new game.


Sony and Valve both had to work a bit here, as Steam games had never previously been available on the PS3. As such, a nice overlay was created with the ability to link your PSN (PlayStation Network) account to your Steam account. The PS3 version of the game even comes with a CD key allowing you to activate the PC version of the game on Steam as well.

So it was with much enthusiasm that I tried to connect to PSN and get this process going. But alas it failed, with some obscure error code. Searches online linked only to router options, proxy settings and port forwarding. And so I sat down, sifting through my router settings, one by one, trying to find the source of my problem. Fortunately I was saved too much effort by a message from mentioned friend, informing me that he too can no longer login to PSN.

The joy of this is that if you can’t login to PSN, you can’t multiplay. The obscure error message has since been replaced by a notice informing us that the servers are down for maintenance. The PSN website and twitter feed inform us that it’s probably going to be down for a few days, and they’re not really sure what’s wrong.

As far as I know, this is the first time that something like this has happened to PSN, and I can’t but wonder if the link with Steam has somehow caused this issue. In the mean time I’ve started following the official PSN twitter feed in anticipation of it’s return. I’m also making headway into my work, ensuring time in the future to enjoy the benefits of Portal 2 co-op.


With reference to the SP game itself though. It was as enjoyable as the first, and with the addition of various new game mechanics made for a truly great experience. Excellent casting, especially of Wheatly (Steve Merchant), and an ending equalling the predecessor’s. The story followed on nicely, with constant references to other games and previous events keeping one listening intently to what was happening.

Update: PSN has been haxxored. The official words are: “An external intrusion on our system has affected our PlayStation Network”. So they’ve shut it off while they conduct an investigation. No estimate as to how long it’s going to be off.