Password Protect Office 2010 file with read only

I recently had to throw together an Excel spreadsheet to keep track of people’s attendance to a meeting. It was necessary for the file to be password protected so no one could edit it, but at the same time I needed everyone to be able to view the file.

I remember having done it in Office 2003 without hassle, but in recent years haven’t had the need. And when trying to get it done in Office 2007/2010, I just couldn’t get it right. Google searches were also proving rather futile as most of them referred to the obvious protection options which couldn’t accomplish what I wanted.

If you go to protect in Office, you can choose to make a file Read-Only, you can save it as a Final copy. But then I can’t edit it. You can also password protect sheets, so I did that at first, but then if you want to edit a sheet, you have to un-protect the sheet, make your changes, and then re-protect the sheet. This would work, but I knew at some stage, me or someone else would forget to re-protect the sheet before closing the file.

After much searching, I eventually found this page which gave instructions on how to do it. And it’s fairly easy.

Instructions

  • Go to ‘Save as’
  • Click ‘Tools’ at the bottom of the window, and then ‘General Options’
  • Type in a password in the ‘Password to Modify’ block and click ‘OK’.
  • Save the file as what ever you want it to be.

Fairly simple, but very difficult to find if you don’t know where to look.

Restoring Windows to a smaller drive

I recently invested in a 120GB OCZ Vertex 4 SSD drive. I bought it to replace my 750GB HDD in my laptop. Although it’s quite a knock in space, I was only sitting at about 110GB usage at the time, so figured 120GB limit wouldn’t be an issue, and I’d have a 750GB portable drive to carry around for anything extra.

I was planning on doing a fresh install. When I purchased my laptop it didn’t come with an install disk, so I used Lenovo’s OneKey Backup program to make a set of 4 install DVDs which would pretty much take me back to original state.

I got the SSD, easily swapped it out with the HDD and booted from the backup DVDs. I went through a few menu steps only to be greeted by a box telling me that the drive was too small for the install. The install was less than 30GB, but apparently because the partition the install was on was 750GB, you can only restore to a drive of the same size or larger.

I then decided to give the Windows 7 backup system a try. It would mean I’d be back up and running without any extra installs, but after making the backup onto a portable HDD and then booting with a Windows 7 DVD I had on hand, I experienced the same problem.

Reading up a bit, people suggested shrinking the partition on the 750GB to less than 120GB. When trying to do this, Windows told me, that due to “Immovable Files” I would not be able to shrink the partition to less than 320GB. Didn’t help much, made a new backup but still got the same error.

After some consulting, I booted up in Kubuntu and used the linux drive manager to shrink the partition to a round 80GB. Trying to reboot into Windows resulted in a failure to launch. Fortunately this was solved by running a Windows Repair from the boot DVD. I was then able to boot into Windows, create a backup which successfully installed on my SSD.

tl;dr

  • A backup that you wish to restore must be of a partition that is smaller than or equal to the size of the drive you wish to install onto. The rest of the space must be unclaimed.
  • Use Window’s Disk management to shrink your main partition to less than your new drive’s size. Format the rest of the drive and ensure it is un-allocated.
  • If Windows can’t make it small enough, boot using a linux live boot CD. Freely available. Use the applicable distro’s management software to shrink the partition to the desired size. If on reboot Windows fails to launch, boot with a Windows install DVD and run the repair software. Note: I place no guarantee on this solving any issues that messing with partitions from linux may cause
  • After booting into Windows, create a backup of the installation onto a network drive or portable HDD.
  • Switch out your new HDD/SSD
  • Reboot with the Windows DVD and follow the repair process to backup from an image.
  • Select the appropriate backup and follow the steps.
  • Once installed you can go to Window’s file management again and expand your partition to consume the entire drive.

Python & MySQLdb queries not executing

As part of my master’s project, I’m implementing a very simple monitoring system. Logs are continuously stored in a mySQL database, and one can get an overview of the system by viewing a website. This means one can monitor the system wherever you are, and there are no software costs. Important for my sponsors.

My database needs to get data from a serial connection, and having successfully established a connection from Python in a previous project, I figured I’d stick with this, meaning the only difficulty would be communicating with the mySQL database from python. A bit of research revealed this should be quite simple, as there’s a very convenient MySQLdb library to aid communication.

FYI: I’m running Windows 7 64bit. Python 2.7.3 32bit. MySQLdb-python 1.2.3.

A little while later I had it all up and running and successfully executed the test examples with a simple:

cur.execute(“SELECT VERSION()”)

This revealed I was running

Database version : 5.5.24-log

All fine and dandy. I then setup a simple Insert query, which although it didn’t result in any error messages, failed to successfully update the database. Executing the exact same query from phpmyadmin resulted in the record appearing in the database. This was several months ago and I struggled for a few hours each day, making small changes to the code which might possibly affect the way it’s executed. I also shifted through pages of appropriate Google searches, all to no avail.

I gave up on the problem for a while, and today decided to give it another go. I tried it on a different computer, installing everything from scratch. Yet still I encountered the same problem. After some more time spent sifting through stackoverflow problem pages I came across someone with a problem kinda like mine. The solution to the problem was that the database was set to not auto commit exectued queries. Fine, I check mySQL, but autocommit = 1, so I assume that’s not the problem. Sifting through a few more pages and someone links to an FAQ mentioning the same commit problem. I add the line

connection.commit()

to my python code, and voilĂ , it works. Hours of frustration, hidden away in an FAQ.

Design of a 2-axis, Continuous Rotation, Camera Control Platform

This was the title of my final year project for my BEng (Mechatroics) degree at the University of Stellenbosch. It’s been a year, a loooong year, but at the same time it’s passed so quickly. I’ve probably spent more time on varsity work this year than in any other previous year, a combination of this skripsie, mechatronics and electrical design projects, interspersed between the year’s class requirements.

You can see a summary poster of the project here. And the full report here.

Skripsie is something very different to what we’ve done previously. We’re given a year to complete the project, which is a fairly long time. What I’ve appreciated is the fact that it’s the only major project we’ve been given to do individually. It’s not that I don’t like other people, it’s just that it’s sometimes nice to be able to do things my way. Most of the projects are put forth by lecturers, and they act as supervisors for the projects. I’ve been very fortunate with my supervisor and his continued support and enthusiasm for my project.
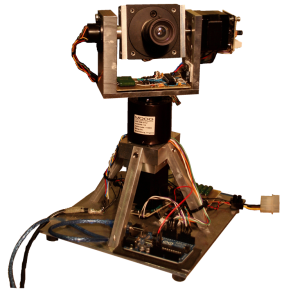
Final Product

Final Product

So what is it? Well it’s basically a turret that is capable of continuous rotation. You get a bunch of pan/tilt cameras on the market, but they all stop after 360textdegree or less. The department I did my project with had purchased several Basler a311fc cameras to play with and desired a platform they could use for tracking. It’s a very nice camera, good quality and capable of fairly high capture rates (50fps @ 640×480, 132fps @ 320×240) and comes with some nifty software (Basler Pylon Driver) to control it. So the major issue was to transfer data and power to the camera. I looked at a couple of wireless solutions but for simplicities sake eventually went with slip rings. Picked up 2 slip rings (at quite a cost, well I was surprised at the expense) from Moog.
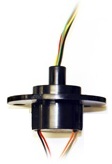
a slipring

a slipring

Next issue was control. My control systems has never been the strongest, so decided to stick with some open loop control in the form of stepper motors. Picked up a 220Nmm and 440Nmm stepper motor to control the tilt and pan respectively. They’re bi-polar hybrid stepper motors with a 0.9textdegree step size. I drove them both in half-step mode effectively giving me 0.45textdegree accuracy. To drive them I made use of a combination of L297 and L298 ICs from ST.

The idea was to be able to control this all from a PC, so some software development and integration was also required. To bring it all together I made use of an Arduino Uno. I developed a GUI in Python which then communicated via a serial connection with the Arduino. I was originally going to use Java for this, but couldn’t get a serial connection running. Chatted to some friends who suggested Python and found this post with a nice example. For testing I also got hold of two AS5040 hall effect sensors from Austria Microsystems. These rotary encoders give a 1024bit resolution, effectively 0.35/textdegree. I managed to find some nice code for the Arduino to read the data via SSI over at RepRap.
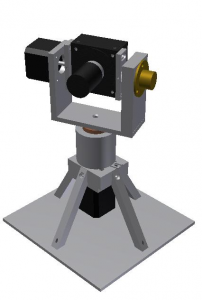
CAD Model

CAD Model

This was also the first time I’ve had the opportunity to develop CAD models of something and have it built. We’ve done several machine design projects over the years, but they’ve all been conceptual only. I didn’t machine the stuff myself, but it was pretty cool when I built the thing, and compared it to my model, and it looked the same.
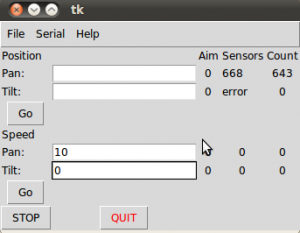
screenshot of the UI

screenshot of the UI

So I handed in the final report on the project today. Unfortunately it’s not working 100% at the moment, and one of the motor driver circuits got damaged, so I need to repair that before my presentation in a few weeks time.

But until then, it’s 3 exams in 3 weeks, so ought to be pretty chilled. And I’m almost an engineer o/