tl;dr: Thought keyboard was broken, only needed battery replacement.
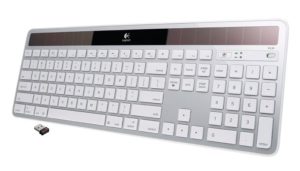
 Since the Logitech K750 was first released, I was a fan. But the $100 price tag put me off. It’s most noticeable feature is the fact that it has a bar of solar panels along the top of the board which are used to charge the built in battery. This should mean you never have to replace the battery. A dream come true to me, who in general is disposable battery averse. Besides that it’s a standard wireless keyboard that uses Logitech’s unifying receiver, I additionally like the style and design of the keyboard.
So joyous was I to find it on a half-price special at some stage, promptly ordering it and enjoying it’s use. Two years later, on returning from a short trip, the keyboard no longer worked. Not registering keypresses, nor activating any of it’s notification lights. The battery is not supposed to be replaced, but is relatively easily accessible, so I popped it out and measured the voltage.
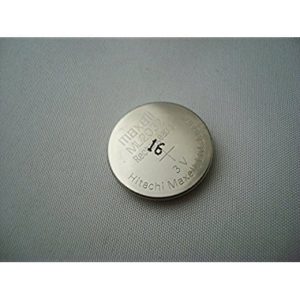
 The battery used is a rechargeable coin-cell battery, similar to what is used on motherboards, an ML2032 3.0V battery. My battery measured 2.9V, so I assumed it was still fine, and something else had gone wrong. The keyboard had a 3-year warranty I was still within, so after the retailer rejected me, I contacted Logitech who were kind enough to send me a replacement that continues to work perfectly.
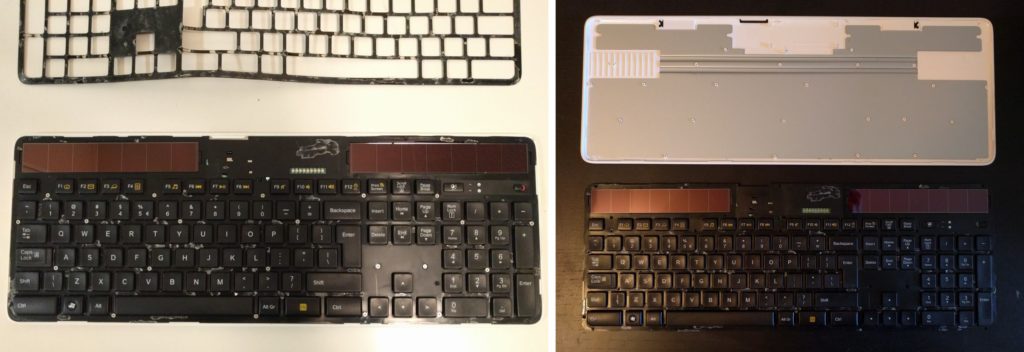
This was over a year ago; in-between a lot has happened, but Logitech didn’t ask me to return the old keyboard, and I couldn’t bring myself to throw it out. I figured I’d salvage the solar panels or something. I found it the other day and decided to take another look. Although the battery comes out relatively easily, the keyboard’s faceplate is glued into place. So to disassemble it you have to pry that off, making reassembly difficult.
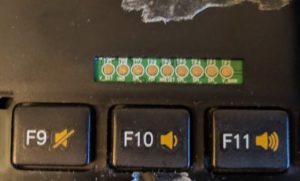
After that there are a number of screws to remove, and then the base separates, giving you access to the circuit-board. On the front are a few test-points. With my old battery plugged in, V_BAT showed 2.86 V and V_MAIN showed a steady 2.0 V. I tested some other components but couldn’t find anything notably wrong with the board. Solar panels provided a charge.
So I popped my battery out of my new keyboard, and lo and behold it worked. I measured the voltage and it reflects marginally over 3.03 V. Apparently a 0.15 V drop on this battery is enough to stop the keyboard working. I measured the V_MAIN on the test points, and it showed an match 2.0V, like with the ‘bad’ battery. This also meant my disassembly was completely unnecessary. So with it in pieces, I ordered a replacement battery.
Now I have two working K750 keyboards, although one is slightly disfigured.
April 2021 Update:
My original keyboard is still working after replacing the battery.
My second only somewhat works. If I try turn it off, it doesn’t turn off immediately, but only after a few minutes. Once it’s off, it can’t be turned back on. However, I’ve found that if ‘jumpstart’ it by shorting the V_BATT and V_MAIN terminals together for a few seconds, then it works again until it is turned off.


Gareth, thanks for sharing your experience. I have a similar issue with my K750, in that it stopped working completely, but a new ML2032 3.0V battery didn’t solve the problem.
Having already taken it apart to check the on/off switch (it was fine), and inspired by your article, I measured V_BAT at 2.96 V for the old battery and 3.00 V for the new one. I wondered if such a small difference in voltage – even smaller than what you had — could really make it stop working? To investigate, I hooked up a bench power supply & found that it worked absolutely fine with a voltage of 3.00 V displayed on the power supply (which gave a V_BAT measurement of 2.99 V, i.e., less than V_BAT for the new battery) and, in fact, it worked all the way down to 1.50 V (V_BAT measured at 1.49 V).
So it doesn’t seem to be simply a question of sensitivity to a small drop in voltage as the battery ages, at least not in my case. But I’m otherwise baffled. Any further thoughts?
Hey FC. That’s really interesting. I’m afraid I don’t have any immediate ideas as to why it worked with your bench supply, but not on the new battery. Normally I’d suspect it was something to do with the amount of current the battery can supply, but in this scenario, the current draws must be minuscule. Doubly confusing is that off the power supply it continued to work well below expected voltages.
Hi all, and really great to see someone took a closer look!
Not sure if anyone is still working with these k750 as this post is slightly dated. I still got 3 of them …meanwhile…broken ones.
It started exactly like you mentioned. All of a sudden it stopped working. The solar panels deliver about 3.x volts, the battery is at 3.04V, but no battery-check LED and most important, no function/connection to the logitech unifying receiver.
So I bought 2 ‘broken’ ones and thought I find out what’s wrong and hoped to eventually fix them. Now I have 3 functioning solar panels and rechargeable batteries and can only assume that the keyboard module is the issue. But the keyboard module is so glued and melted together, it’s useless to even think about getting it apart and fixed.
I think that a keyboard of my favorite brand should last longer then 2 yrs and I had never such a bad experience with logitech devices. The idea with the solar panels was excellent, but hey logitech, you can do better!!!
I’ll see what use to make of the solar panels now.
My original one is working again after replacing the battery.
My second one ‘works’, but it’s always on. If I try turn it off, it doesn’t turn off immediately, but only after a few minutes. When it does, it can’t be turned back on. I have to ‘jumpstart’ it by shorting the V_BATT and V_MAIN terminals together for a few seconds, then it works. I like Logitech products, but between this and their speakers I’m not sure…
Excellent! I’m getting closer to a potential repair and understanding. Could you please briefly explain V_BATT and V_MAIN terminals?
You can see in this image, if you remove the facia, just above the F10 button are a number of labelled test points. My keyboard wasn’t working, and I noticed V_MAIN was 0V I think, so I shorted it with V_BAT for a few seconds, and the keyboard started working.
Thanks garethc …
I tried this but it didn’t work for me unfortunately…
Ordered a refurbished K800 and hope for a better electronic inside ;-)
Do you happen to know the size and offset of the diagnostics pads? I’m planning to expose this by cutting the top layer off that covers it’
It looks like it starts at the right edge of F9 key and spans to the halfway point of the F11 key… I’m guessing its about 5mm above the F10 key and maybe 4mm tall?
The slot is 5mm high and 30mm long.
Bottom left corner starts directly inline with the F9 key’s right edge, roughly 5mm above it.
Thanks, I was able to cut it open with a dremel, taped over the solar panels , replaced with a non-rechargeable CR2032 and used a bent paperclip to jumper v_batt to v_main and my solar light blinked green… the keyboard now works again as long as those pins are jumpered.
I had first tried using my multimeter, which showed ~3 voltage, but that didn’t activate the keyboard… later I started to sus the multimeter when it showed ~2V even without a battery and solar panels covered.
Anyway, after 6 years on the junk pile, who’ve thought a paperclip would fix it.
Thanks much for posting
glad it’s somewhat working :D
Do you have vbatt and vmain connected together permanently? Or do you jumper them only
for a while after turning on the keyboard?
I followed this trick and touched the two points, it seems to consistently make the keyboard usable once I switch on the keyboard and jumper the points. But then turning the keyboard off and on again requires another jumper.
Considering soldering the two points together but don’t want my keyboard doing other strange things so I thought I’d check!
Hmm, that’s an interesting thought. I haven’t looked at the circuit in-depth. I only short it when I need it to turn it on again.
okay, thanks for the reply, perhaps i’ll jerryrig a button instead of soldering the points permanently together.
This is great, shorting out the Vbat and Vmain got my keyboard working again as well.
Makes no sense as battery has plenty of charge.
Also now, it seems I need to re-jump start the keyboard if I ever switch if off again. But leaving switched on is fine.
Thanks.
Awesome, glad that worked for you!
Actually despite the solar app showing it is receiving plenty of light and the battery (new) being fully charged, it looks like my keyboard is not charging the battery at all.
Possibly the inability to charge is the same fault as it not turning on. Some break in that circuit somewhere.
I probably could just put in a lithium battery every 3-6 months (seeing it doesn’t charge anyway). But I will get a new keyboard.
It was still fun!
Interesting. I also saw the that the app was showing that it was charging and just assumed it was. Haven’t actually tried measuring the voltage myself.
Thanks for the reply! they actually sell a standalone charger on aliexpress, might go this route since I now have 3 ML2032 rechargeables from trying to repair this dang thing.
https://www.aliexpress.com/item/32858338387.html
out of curiosity Jay, are there any indications the charging circuit is working when you leave it switched on?
Thanks for the update Jay, any signs that your charging circuit is working once you jumpered it? I hastily cut off my solar charging circuit from frustration yesterday then realized this v-bat v-main jump-start trick actually works consistently.
Hi, Many thanks guys, for this SECRET WINDOW above F9 , I use jumper the v.b and v.m … k750 works as long as switched on. After off , not working again till jomper is done. Other my k750 has different problem… v.b -v.m shows 0,8 V but battery is new, meter showing 3,2V . What might be the reason and how to fix it, please?
you likely have corrosion or a dry solder joint, so basically there is either too high of resistance due to perhaps residue from a spill or a corrupted battery or there is not a sufficient contuctive pathway between two critical points in the circuit.
you rock man! I spilled full cup of coffee on my K750 (9 years old .. i could never live without it ) …had to disassemble it and clean it inside i guess it is not water proof…
when i put it back it turned on ok.. .but day later .. it turned off on its own.
took out old battery measured 2.8 v. popped new one keyboard turned on no issue.
next day keyboard was dead again … had to order replacement on sale for 43 dollars on Dec 12 /23 . … but it takes 5 days to arrive so i looked up internet and your blog came up, had to short Vbatt and Vmain …k750 was back in service in no time. Thank you .. i was going to throw it out, save me 50 dollars and now i will have backup keyboard .
Awesome! Glad this was useful :)
It’s a failure one the power switch board or the ribbon. The resistance is too high. IT’S NOT the switch itself. I just shorted the pins on the keyboard connector on the control board and disconnected the power switch board completely. The keyboard is now always on. Considering it’s 12 years old it’s a win. I also replaced the crappy little CR2032 with 2xAAA eneloops. No more worries about discharging.
If you want to be anal about it you can order the board via the P/N: 210-000934, but you might end up figuring out it’s actually the ribbon cable from the power button to the control board.
Images of the repair: https://www.evorion.hr/k750/
Wow, that is amazing.
Dear Vlatko Šurlan, can you explain a little bit more on how you shorted the pins?
I assume image number *IMG_20240920_150000_690.jpg* is the one showing the shorting. The image is a bit blurred (while the last image is pretty crisp) and I cannot identify the pins.
This keyboard has been a life saver for many. Now, it is failing on me because of the power switch. It has two strange behaviors for me:
1) it turns of after a couple of seconds
2) it has been connected to the letter J. So, switching it ON types the letter “j”; and once the keyboard is on, the normal letter j on the keyboard is inactive.
So, I am hopping that shorting the pins could solve my problem as well. Please help me on how to do it.
The pins that need to be shorted are pins 2 and 3 just as in the image. You can identify which pins need to be shorted very easily. Just short them using a tweezer or a staple or anything metallic and the keyboard will turn on if you got the right two pins.
1) The keyboard turning off is the standard problem with this fault. The resistance on the traces is so high that the turn on signal is on the verge of being unreadable by the controller. So as soon as the signal goes bellow the needed threshold the keyboard goes off. The short fixes this issue.
2) The J letter is a mechanical failure of the key itself. The short will not fix that. You have to check if the key is failing mechanically or if the traces in the membrane got broken. You can probably easily fix that using some conductive silver paint like in this video: https://www.youtube.com/watch?v=REz928pgCII