Octane Ratings (in America)

Besides Americans calling petrol gas (and gas propane, diesel is still diesel (when you can find it)), their octane ratings are different to what I was used to. Back home (in South Africa), the standard octane rating at the coast was 95, and 93 at higher altitudes. If I recall correctly my Audi’s manual told me to always use the highest octane possible, but at least 91.

So I was quite surprised when going through our Tucson’s manual and came across the statement:

Fuel Grade: Pump Octane Rating of 87 or higher

This seemed oddly low to me. When we went to go fill up at the gas station in the US, we were greeted by a choice of Regular, Mid or Premium fuel. Referring to fuel with an octane level of 87, 89 or 91 respectively. Another surprise, as by the coast in SA, all you get is 95. No choice.

At the end of the day, it’s actually rather boring. Basically there are different ways to to calculate a fuel’s octane rating, and different countries use different methods. It can be summarised like this:

US shows the average of the Research Octane Number (RON) and Motor Octane Number (MON) rating, which is the Anti-Knock Index (AKI) while Europe just shows the RON rating which gives a higher number than the MON rating – source

If you want to know more about octane, spend two and a half minute’s of your life watching this guy’s video. If you want to know more about measurement methods, RON and MON, check out Wikipedia.

But what it boils down to is an 89 Octane in the US, is actually equivalent to around a 94 octane back home. You also have price discrepancies between fuel grades:

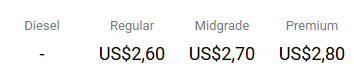
Fuel prices at our local garage

We are also fortunate enough to live in California, who have the second highest gas price in America, after Hawaii. At an average price of $2.80 per gallon (ZAR10.17 per litre), it is $0.70 more per gallon than South Carolina.

Gas prices also fluctuate tremendously within a city. In South Africa, petrol prices are basically fixed, meaning you pick a garage by convenience. In LA, I can pay anywhere from $2.60, to almost $4.00 per gallon! That makes petrol almost as expensive as in SA!

Particle Internet Button with Photon – Web status notifier

After a fun weekend at the Hackaday Super Conference I came out with a few toys. On Sunday I took part in the Particle IoT workshop, where they were kind enough to provide us all with a Particle Internet Button and ran us through setting these up and getting them to do things.

The board is essentially an add-on for the Photon board that can be purchased stand alone. The Photon is what you’re actually programming and includes a Wi-Fi module and runs an ARM Cortex M3 microcontroller. The Internet Button adds an accelerometer, four buttons, a buzzer and 11 RGB LEDs to the mix.Particle Internet Button

It’s powered by USB, and can be setup with just their cellphone app, although I had problems due to the terrible way my internet is setup at home (I have no control over it, yay rental). I ended up using the CLI via USB. This was necessary to give the Photon the Wi-Fi details to connect to the internet.

Once it’s connected to the internet, all the programming takes place wirelessly via Particle’s online IDE. There’re a host of examples and libraries to pull from, so it’s amazingly quick to get a simple program running, pulling data from the accelerometer and making everything flash multiple colours. Particle also has some built-in integration for internet notifications and interactions, being able to control aspects from Particle’s console and elsewhere.

Left: All Green - good Right: white is checking site, red means a site failed - bad

Left: All Green – good
Right: white is checking site, red means a site failed – bad

I didn’t really know what to do with mine, so after playing around with all the examples, I set out to make a notification device to tell me whether my websites are all running or not. I have four websites I’m interested in, they’re all on the same shared hosting package, but separate domains.

This project is nothing amazing, but was fun to do, and I was able to get it working in one afternoon. Most of the time wasted was just due to being out of practice with programming.

Functionality:

  • Polls four separate websites to see if they are running.
  • Shows a green or red light to indicate if the website responded correctly or not. Shows a white/orange light while it is checking it.
  • If a website fails a check, the buzzer tones.
  • Checks all websites every 10min.
  • Can trigger earlier check by pushing button 3
  • If one or more websites have failed a check, you can shake the controller to get it to recheck just the failed websites.

At the moment I don’t get very good information from the website. I basically hosted a plain html page on a subfolder of my websites which contains a string. I then compare the string the Photon loads to what it should be. I want to look into the package a bit more to see what info I can get and differentiate between server not found and other errors.

Online log: left it running overnight. a couple failures. I blurred website address as they're projects I'm still working on. Failure is due to cheap hosting I believe, not the Particle.

Online log: left it running overnight and saw a couple failures. I blurred website address as they’re projects I’m still working on. Failure is due to cheap hosting I believe, not the Particle.

The code isn’t very pretty, I’ve got silly little delays all over the place ’cause it’s working and I’m lazy and a lot of the stuff was imported and copied in. I may update it someday, but you can view it here. I made use of the Internet Button library as well as the HttpClient library (self confessed requiring work, but I can’t complain).

Ballona Creek Bike Path

While some may say calling it the Ballona Creek Bike Path gives it a far more romanticised name than a concrete river deserves, as you get to the sea some natural vegetation and wildlife does appear. And regardless, the beauty I see in the bike path is not in the visuals, but the ability for me to escape the hustle and bustle of the LA roads and ride without being impeded by traffic lights.

After a successful ride along the Marvin Braude Bike Path, next on my list was Ballona Creek. Starting in the heart of Culver City, the bike path takes you 6 miles all the way to the sea, just south of Marina Del Rey where it meets up with the Marvin Braude.

I continued my cycle north to Santa Monica, before cutting back through traffic to University Park.

Once again I strapped on my GoPro and went for a ride, you can see the compilation below:

More info on the route can be found here.


Flying with a bike & Fork regrease on MTB (Merida Ninety Nine 9.600)

I recently had to fly with my bike, and the airline wasn’t going to take it for me, so I ended up having to freight it. I used Emirates SkyCargo, and they first look at the weight of your item, and then calculate a volumetric weight, based on the dimensions of your package (LXBXH div. 6000).

My bike as it should look

My bike as it should look

Their minimum billing amount is 30kg. My bike and accessories definitely weighed less than this, but the standard bike boxes are significantly larger than what is considered a volumetric 30kg. As such I went to town cutting my box down to size. But to get the box small enough, I also had to almost completely disassembly my bike. I removed the wheels, and took my tubeless tires off the wheels. I removed the saddle, the rear dérailleur, the pedals. Then I took the fork out and separated the brakes from the fork. And then squashed it into my box. And it all fitted. I even got my tent, helmet, pump and one or two other items in.

Cramming my bike into a box

Cramming my bike into a box

So my dad helped when I did all this, and I didn’t pay too much attention when we removed the fork and put all the bearings loose into a small bag. I wish I had, as it would have saved me a couple disassemble and re-assembles of my headset. Regardless now I know a lot more about the topic. After all that, I decided quite a bit of dirt probably got in during the hassles and decided to re-grease the bearings.

How my bike sometimes looks

How my bike sometimes looks

It seems like the number of variations for headset bearings is a lot. I couldn’t find an example the same as mine, so I figured I’d put some pictures up here. I tried recording the whole thing, but that was humorously terrible :) So instead I just took some screen shots.

The bike is a Merida Ninety Nine 9. 600. The headset is described as “big conoid semi”. It makes use of non-sealed roller ball bearings. The lower bearing is just a bearing, and the upper bearing consists a bearing, a seal, an upper race and a centring ring. If you do do this, I really recommend getting a nice bike stand, my bike was falling all over the place while I was trying to hold it together.

  • Loosen clamps on fork stem
There are two bolts on the stem (one on either side) and one on top for tensioning

There are two bolts on the stem (one on either side) and one on top for tensioning

  • Remove fork and bearings
  • Clean bearings and races (I just used paper towel, but some degreaser will help)
Bearing after having grease removed

Bearing after having grease removed

  • Place some grease on the races and bearings (I just bought a small tube of automotive grease from local hardware store).
  • Replace all bearings in order you removed them
Bottom bearing goes in with balls upwards (towards bike frame)

Bottom bearing goes in with balls upwards (towards bike frame)

Top bearing goes in balls facing down (towards bike frame)

Top bearing goes in balls facing down (towards bike frame)

Top bearing gets additional seal, upper race and tension cone

Top bearing gets additional seal, upper race and tension cone

  • Tighten bolt on-top of fork (to tension the package), then tighten clamps on stem.
    • If you’re unsure how tight they must be, find specified torques in your bike’s technical manual.